Monday, December 1, 2008

Light Painting Kidney Beans


Last month while on assignment in Western Nebraska, we spent some time on a kidney bean farm. I came home with a handful of beans and a photo idea that fermented for a month before I finally put all the elements together and started shooting. A few beans, an old piece of plywood, mini-mag flashlight with map reader, and my nicest shirt.
Here is how I created the shot.


Sunday, November 30, 2008

Emerald Pools


If you spend a few days in Zion National Park, one of your planned destinations should be the Emerald Pools. A short hike along some very nice trail will reward you with a view of the high canyon walls, red like so much of Utah, over a thousand feet straight up. People were camped on the side of the shear wall, too much to climb in a single day their bivouacs were perched dizzyingly high, a web of safety lines attached to their shelf-like protrusion.
At the base of all that vertical stone is the mirro-like Emerald Pool. A quiet little oasis of lush vegetation and crumbling rock. The fractured, fallen pieces of the cliff, huge chunks of stone, sit all around the water.  The reflections were irresistible.

Friday, November 28, 2008

Zion Water


The path continued on through the trees and ferns, the sound of rushing water growing louder with each step. The trail emerged from the woods and lead to a small footbridge that crossed a beautiful creek. Instead of crossing the bridge and continuing along the trail I decided to walk upstream along the bank to find worthy ground for a few tripod holes. 
The day was gray and the overcast meant that a long exposure of moving water was possible without having to stack a bunch of neutral density filters over the lens.  I found a spot that was relatively clear of the Fall debris cluttering much of the water, set my tripod up and started shooting. After a few shots, adjusting the shutter speed and aperture to achieve the amount of motion I wanted to show in the water, I headed back to the trail and crossed the bridge. Off to the "Emerald Pools", one of Zion's famous beauty spots.

Sunday, November 23, 2008

A Leaf

Walking along a trail in Zion National Park reminded me of the rain forest of the Olympic Peninsula in Washington State. Everything covered in wet. Moss on every surface, fungi sprouting from the rotted, fallen trees. Water rushing nearby but unseen, some creek hiding beyond the thick green foliage. As I tried to make my way to the hidden water, I came across a large moss covered rock with a few brightly colored leaves sitting upon it. The moss was thick, like a cushioned blanket set over the stone. One leaf in particular seemed........ comfortable, as if the fall from it's perch above had somehow left it tired and ready for sleep. I raised my camera "thats' worth a shot". The rest is pixels. 

Sunday, November 16, 2008

Morris Mini Slave

Since the first time I saw a Morris Mini in action, I have been intrigued by all the possible solutions they offer and with the trend moving to lighter and more compact gear, the "Morris Mini Slave Wide Plus" is now more than ever one of my favorite tools  in the bag of tricks.


This little strobe runs on two AA batteries, charge time between pops is about 4 seconds, and without a modifier during some testing I was getting F5.6@ 4 feet/ISO 200.
 
Along with a ready light for power indication and a sync port for hard wiring,  it has, as the name implies, a built in optical slave that makes the flash fire when it sees the pop from another strobe. Awesome! And they can be put just about anywhere... held in a hand or hidden by a laptop, set on a shelf or hung from a ceiling. There is a quarter-twenty thread on the bottom that makes it easy to put on a stand or a stud for all the rigging possibilities.


Mine of course, have been covered in velcro for my modifiers and using a trick learned from "Mr. Industrial"(David Tejada), or as I call him....... "boss", I have made a bunch of tiny gels that fit over the actual strobe bulb. The clear globe on the front of the Morris unscrews to expose the bulb and allow access for your gel application. Morris makes an accessory kit of color  FX snap-on filters but there are only 4 colors and none are for color correction. I suggest using a gel sample pack to make your own so that you have a full selection of creative colors at your disposal.


When it comes to using modifiers, I have troubles with the built in slave seeing the flash and firing, covering the Mini with silk or sticking it into a snoot renders the slave inoperable.


For this problem I use a PN peanut slave. Plugging the sync cord that comes with the Morris into the strobe and then putting a micro optical slave on the other end gives you a way to get out from under your modifier with a slave that can see the other strobe(s). I am sure there is a way to get one of these to fire using a wireless radio remote, some specific cord, but my own research has found no obvious answer. Any comments or suggestions on this topic would be greatly appreciated.


Testing my Morris Mini with DIY snoot and peanut micro slave.


Here they are in action. The blue in the background is a Morris on a backlight stand. It has a foam flag on it to control the spill and the blue gel is cutting the power down about 2 stops.
A 2nd Morris is sitting on a shelf behind me to my left with a full CTO. It is putting a warm kicker on my left cheek and mixing with the blue to make the third color over my right shoulder.
The main light is a Nikon SB28 through a 43 inch umbrella, skirted vertically to keep spill off the background. The SB is triggered with a Pocket Wizard and the two Morris strobes are using their built in optical slaves. There is a fill card on my right to open the shadow side of the face just a touch.

Tuesday, November 11, 2008

Light Painting at Camp

Campsite light painting


This is from a campsite at the top of McClure Pass here in Colorado. My friend and I were on a road trip to the southwest corner of the state from Denver, mostly just to take pictures, camping along the way.
It was late our first night when we decided to pull out the tripods and cameras for some star shots. Soon, we were trying to use my SB28  to add a pop of light on the trees. It didn't really help the star shot but it got us into a lighting mode. So we started messing around with a  big Maglite, painting the trees and ground. The first couple of shots got us really going. Forget about the stars. How about that SB28 in the tent with a Pocket Wizard? Cool!
An hour later we were running around during 30 second exposures, performing a well choreographed series of movements with our flashlights. We must have run through it 50 times, trying to work out the details. Keep the camera from seeing the flashlight, don't stand in front of what you are lighting, watch out for the tree root you keep tripping over. Flashlight off, move quick to the other tree..... flashlight on, 4 seconds of light on that, flashlight off, move to the next tree, flashlight on, 2 seconds on that tree....  and that tree, exposure over. Back to the camera to see what we got.
The photo above is final result with just a little help from Photoshop to remove a branch that was extending into the tent.

During our return trip to Denver, we stopped off at Grand Mesa and camped again for our final night.  Our campsite there just wasn't as scenic so we tried to add the human element for interest. We also outlined the tent with a mini-Maglite and again put the SB28 inside.


Friday, November 7, 2008

Looking For Details

  Went shooting with a friend one day way up north of Denver,  farmland and dirt road territory. We stopped on a rural road beside this old red storage tank just as the sun was breaking through some afternoon haze. We grabbed our cameras and started hunting for shots.
After about five minutes of exploring the area and making a few pictures, it was back in the car and off to see what the road would show us next. This is one of my shots from that brief stop. 

Thursday, November 6, 2008

One For Fun

Cruising around last year in rural Colorado I found this rusty old train car sitting on an old rail line. I walked around it a few times, pondering it's history and looking for photos.

Wednesday, November 5, 2008

Photoshop Practice


Practicing the computer side of things is probably as important as practicing the photography part. My proficiency with Photoshop is something that needs improving and I have recently come into the possession of a Scott Kelby book that has me learning some new techniques while reinforcing some old ones. Mostly I am just trying to learn the quick keys and to commit some things to memory so that I don't have to figure it out every time I need it.

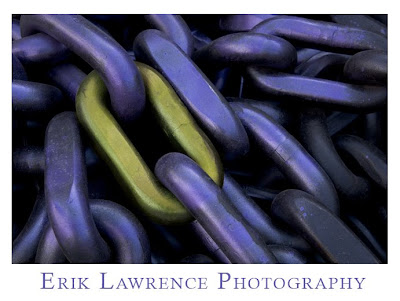
This is a shot from a coal mine in Colorado. There is nothing here to give you a sense of scale but this chain is huge... and it really is purple.
I just made a duplicate layer and messed with the hue until everything looked yellow. Then I added a layer mask and used the brush to add and remove desired parts of each layer. Not from the Scott Kelby book exactly but inspired by it certainly.

Tuesday, November 4, 2008

Last of the Tomatoes

This was yummy! The last of my tomatoes from this season, picked green and ripened wrapped in newspaper. Early Girl and Yellow Tomatoes with some cucumber, avocado, cheddar cheese, fresh oregano, garlic and pepper.

SB28 strobe bounced into kitchen wall. Nikon D70s/50mm 1.8

Sunday, November 2, 2008

Pick & Pic On A Stick


One of my clients is a maker of custom homes and commercial properties. These are the kind of homes you would see on an episode of MTV's Cribs, with home theaters, outdoor living spaces, mega bathrooms and closets you could park a car in. $2.3 million may not seem like much when compared to the cost of some of those MTV homes, but in the Denver area it goes a long way toward making some of the celebrities look like they are coming up short on square footage. 
And the home builder needs images to make a sale. 
Not Architectural Digest images, these places are mostly empty when I photograph them and often they are still under construction. Mostly I just move around from room to room with the camera on a tripod. I pick the composition, get a quick grab-shot and look it over to decide what solutions I have for issues. 
Color temp is usually my first consideration. Is there a bunch of daylight coming in through big windows? Is the tungsten lighting adequate? Is there some dark corner of the room that needs a pop of light? Around 80% of the time I can just "let it go", leave any minor adjustment for post production and trust in my Whibal to clean up the color. 
Truth be told, almost any photograph of an interior space can be improved with a little creative lighting, but this is the trenches, time is short and there are still 8 more rooms to shoot here and 2 other properties on the other side of town. Move out!
Enter the speedlight (its' in the name). For me it is Nikon SB 28s and Pocket Wizards. Setting up 2 of them before I start moving around the house is common practice. I use Justin Clamps or lay the strobe right on the floor or a shelf, I have stands if I need them but they slow things down and are difficult to hide. My camera is on self-timer because of exposures that are usually over 1 second, this leaves me free to hold and point a light during the exposure. I also carry small gels that attach to my strobes with velcro, I can shift the color temperature on the camera and make fast conversions between color balance options.
This week the client sent me back to homes I had photographed during their construction. Now lived in and furnished, it was time for some shots for the clients website.

"Let it go"... no strobes. No window treatment makes for lots of daylight

There is a strobe upper right 

Dimmers on lights can be a big help.
A very yellow room


This is all really basic stuff. Given the time and the budget these interiors could look much nicer,  but for the client they exceed expectations.

Tuesday, October 28, 2008

Grids for Small Strobes


With a new set of Pocket Wizards in my toolbox and a good start on a small strobe collection of  Nikon SB28s' , I decided to scavenge for materials and make myself some homemade modifiers.  Aside from the obvious money savings that comes from making your own gadgets, my favorite advantage is that of being able to create something that is lightweight, compact,  and durable. The resulting grids were born from a fairly sloppy process of cardboard cutting and hot-gluing but I am very happy with the final product. 


The cylinders are cardboard as is the corrugation.
As long as you have velcro on your flash, all of your
modifiers can be made to fit right on it.


I put velcro on my gels too for a quick conversion of
color temp, neutral density or diffusion. 


This was my first design and it was made using pieces of black tubing. It is heavier than I would like, too much rubber and gaffers tape, but the light quality seems very nice.

My nephew stood in for me 
while I tried a few test shots.

Here are results from some testing with the 2 grids pictured at the top. On one of them, I made the corrugation 1.5 inches deep,  and  the other 3/4 inches deep.
 
This test shot is from the 3/4 inch grid


...and the 1.5 inch with the flash
in the same spot.
I am working on some snoots now, stay tuned for results.

Sunday, September 28, 2008

Firehouse Portrait


So my long time friend has been a Firefighter with Denver for several years and I have been asking him to let me come to the firehouse and do some portraits of the guys for quite some time.  He finally agreed and I was surprised that most of them were resistant to the idea of having a nice portrait of themselves. I only had a limited time with him as their day was busy with calls but I think this shot came out fairly nice.  I prefer the version without the background light as the incidence off the stainless steel is just too bright. Two SB800s was all I used, both fired with Pocket Wizards. The main light was bounced into a large wall for a nice big soft source. The 2nd strobe was pointed directly at the equipment in the background with a full CTO and a small foam flag to keep it from contaminating the rest of the shot. All I brought was 3 SBs, 2 stands, a Flexfill, and a Justin Clamp.... a small case of equipment to keep the creativity the main focus.

Sunday, August 24, 2008

Great Workshop


We just had another very fun day with the "Small Strobes, Big Results" workshop here in Denver. If you are a professional photographer or an amateur looking to lighten your load and improve your photos using small strobes, this workshop is perfect for you. We did multiple set-ups with two different subjects and got some great results using nothing more than small Nikon strobes, a few pocket wizards, and a Q-Flash.

Colin Cheadle- Actor


Tuesday, August 19, 2008

What's Hot


Sometimes a simple object can inspire a shot. As photographers many of us have an object that we have been eyeing, we pass it everyday or we see it sitting on our basement shelf, waiting for the moment when inspiration hits and the idea becomes solid. For me that object at one time was this big piece of coal. 
While on assignment at a large coal mine in Wyoming with David Tejada, we spirited away this big chunk of coal with the idea of doing a still shot for the client. The client ended up with a collection of beautiful photos from our visit to the mine and a  still shot of the coal never came to fruition. 
So the coal sat on a shelf in the studio, big as a football, and it sat. For nearly 2 years I would see it as we loaded gear for location or while shooting product stills for clients. Ideas would briefly bounce around in my head about how to shoot it,  and the more we encountered it in uncontrollable situations, the more I wanted to shoot it in the studio as a "stand alone object", just a piece of coal as a canvas for light.
The growing controversy over this resource makes it a great subject for a marketable power shot... no pun intended, and with it's obvious two sided nature it made sense to show a dark side and a light side. 
The inspiration was made final when I got the idea to shoot it on my old stand-by sheet of brushed steel, using incident light to surround the coal with a glow.

Before I even set the coal on the steel, I set-up my incident light, a medium soft-box with a bunch of CTOs and some Golden Amber gels at the back of the set. Once I had total coverage on the surface from the reflection of the soft-box, I set the coal in and hit it with a single gridded light. My Nikon D70s  with my 35-70/2.8 @ F22 finished the job. The rest is pixels.


Tuesday, August 12, 2008

Shoot Yourself


Hand-held D70s with 16mm/2.8.

Self-portraits are a great way to "feel the light".

Wednesday, August 6, 2008

Today's Pic


D70s- 300mm/2.8 with doubler.

Sunday, August 3, 2008

Point and Shoot Backpacking


Just returned home from a backpacking trip in the beautiful Rocky Mountains of Colorado. The hike in was only 3.7 miles thanks to a ride from a park ranger we befriended last year, but the elevation gain was nearly 2,300ft. in that short distance. I wanted to pack light so the pro camera gear just wasn't practical, and as I found out, not necessary for nice pics.
At one point I had planned on bringing a monopod with a ball head quarter 20 but in my quest for a lighter pack, decided against it. In the end, I brought a small point and shoot Cannon with 2 spare batteries and a handful of SD cards...... thats it! Lightweight and easy to operate, cheap compared to my pro gear, super reliable and the added bonus of being able to shoot some video.
We set camp at around 10,500 feet next to a lake that will remain unnamed. We spent 3 days catching some of the largest native Greenback Cutthroat trout in Colorado. Our largest fish was 22+ inches, the average was around 18 inches or so. After three full days of fishing, the three of us landed around 50 trout total, all on dry flies and nymphs. Our philosophy here is "catch and release" despite a 2 fish keeper limit. We bring the fish in, admire it's beauty, take a quick picture and then its' back in the water... "catchya next year"!


Having such a small and simple camera was very liberating, I enjoyed walking around taking pictures and shooting video almost as much as the fishing. My "wish I could" moment came at night when the tents were lit up from within and the stars were shining and reflecting in the glass-like lake. I had no tripod and the camera didn't have enough manual controls to make long exposures for light-painting. The disappointment at my lack of capable equipment was such that I will be bringing the extra weight next time.  Our spot on the lake is amazing at night and on our next trip I am going to get a killer night-shot. Maybe I will leave the tent and food at home, sleep in a cave and eat trout sushi... no, I need the tent for the shot,........ darn.

This is a photo I did last year at my campsite on McLure Pass. I used a tripod, 30 second exposure on my D70s, a strobe in the tent, pocket wizards, and a big Maglite to light-paint the trees. 

Sunday, June 8, 2008

Its' Wabbit Season!


The critters are coming out of their hiding places and I have taken some recent opportunities to shoot some wildlife in the not so wild. This bunny lives just outside my front door and was the subject of a recent practice session with my 300mm 2.8 manual lens. It is an old beautiful piece of glass, fast and sharp with fantastic bokeh. I bought it used from a professional for $275.00. David Tejada has been using his for most of his career and I have long loved many shots captured with it, so when the deal came up I jumped on it.

Last week while house sitting I was able to sneak up on one of the very skidish frogs that live in David's pond. I caught this guy with the 80-400mm on my D70s....... he eats birds!


While in Wyoming this week working on an oil pipeline project, David and I came across this nice little wetlands on the bank of the North Platte River. These guys were flying all over in the cattails and once again I was doing it old school style with the 300/ 2.8 and a doubler, making the effective focal length somewhere around 900mm.